Wednesday, November 30, 2011

My Pug Cake Making Journey

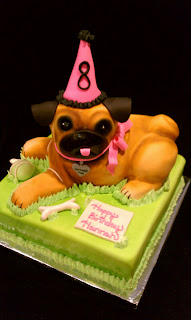
I was recently asked to make a Pug cake for a client last week and although I've made hundreds of cakes, I've never made a cake in the shape of a dog. I love dogs so I was very excited to get started. Got to be honest, dog cakes are very daunting, getting the details correct on a dog can be just as hard as carving a human face out of cake....which I haven't done yet either. So, I decided to take some pics to take you along on my dog cake making journey. My first step was finding a picture of a pug that was detailed enough to carve out of cake. By the way, I've never really seen a Pug up close except at the park or in passing. As you can see alot of my pics have a computer in the background mainly, because I needed a couple of pics of a Pug close by to refer to back and forth. I baked a couple of layers of chocolate cake , filled and stacked them. Once the cake was prepared, I carved away... As I finished carving, I stepped back and was happy to see the shape started to resemble a pug.

Next, I crumb coated the pup with some buttercream.
After chilling the cake overnight, adding a second layer of buttercream and chilling again, I was ready to work on the face. A pugs strongest features are in it's face. Also, added some wrinkles around the body to simulate the dogs movement and position while lying in this particular position.
Next, I covered the cake in fondant. This can be pretty tricky but if you've had as much experience with fondant as I have, you just have to be very patient and precise.
Once it was covered and shaped, I added a couple of details.

Then of course I did a little airbrushing. You need to be extra careful while airbrushing because one false move and your dog can be ruined.

Placed the dog on a grassy platform of banana cake. Added some of the cute details that make this cake a beautiful, dream birthday cake fit for a little girl.
Added a piped Happy Birthday and added some accents like a ball, bone and a personalized dog tag...not to mention his little tongue.


Loved the finished product. Although, I really loved making this dog cake, please know this cake took alot of time to make. Hope you liked my little tutorial. Alot of people ask me how it is I make my cakes and here is one I just had to share with you all.

~Bea~

Wednesday, April 27, 2011

My baking assistants

This Easter season has been one of my busiest yet. Thankfully, I've had plenty of help from my youngest assistants. Time to make some cupcakes! After getting all my ingredients together. Evie and Amber are ready to give a little baking lesson.

After some careful measuring, the girls are ready to crack some eggs. One of my greatest accomplishments as a mom is teaching my girls how to appropriately crack an egg. It took a couple of years but my girls have finally got the hang of it.


While all the ingredients are coming together in the blender...they line the cupcake pans.


Next, is one of their favorite parts of making double chocolate chip cupcakes...adding the chocolate chips.


 Ready to go into the oven!


...And after 20minutes in the oven and cooling down...Evie is a happy girl.The best part about helping mommy out is testing out the cupcakes.

The thumbs up tells me this recipe is hands down pretty yummy. Thanks girls for your help this week...couldn't have done it without you two. Now time to frost and package this little cakes just in time for Easter. ...Till our next little lesson...Happy Easter to all our family and friends!


~Bea~

Friday, April 15, 2011

Monster High Cake


Happy Birthday to my daughter! This cake was a total surprise to my little girl and that was the hardest part of constructing this Monster High cake. Her surprise party was actually held a couple days after her birthday and she cried the day before her party saying "Mommy you make everyone else such beautiful cakes and you didn't even make me one!" I almost ruined the surprise at that moment but was able to hold out till her party. Her expression when she finally saw her cake was priceless.


Make a wish Amber! The best part was cutting it open and finding her favorite flavors; vanilla cake with chocolate buttercream filling and chocolate cake with chocolate ganache filling...mmmm the best of both worlds...chocolate and vanilla.

I must add that I also made her monster high cupcakes. The toppers were made by my crafty friend Adriana. They were a perfect addition to the pink buttercream and cookies n cream cupcakes.

Oh and if you thought I was the only family member with culinary skills...Well, my dad made a super delicious and creative cake too...yummy.

Lastly, if you were wondering what inspired my idea for the Monster High Cake. Well, my inspiration only measured an inch in height. Found it among Amber's Monster High dolls.

All in all, my daughter had a great 7th birthday. Can't wait to see what next years cake will look like.

~Bea

Monday, April 4, 2011

American Cancer Society Fundraiser and Survivor Birthday Celebration

Last year's Survivor Birthday Cake


Cupcakes for American Cancer Society fundraiser held by Everest College RN students
Ribbon Cupcakes for Pass Area Cancer Survivor Birthday. Each color representing a different cancer.
I was recently asked to make cupcakes for a local celebration of life for cancer survivors. I felt honored to participate in such a special event. I personally think it is important to celebrate the survivors and the families of those afflicted with this disease. This is one of the three events I have participated in for Cancer awareness and fundraisers for the American Cancer Society. We all know and have known of someone with cancer. Being in the medical profession I have seen their struggles up close and know how strong they must be to endure the treatments used to treat this disease. For this, a celebration of their life is so important.

Happy Birthday Survivors!

I really wanted to include the cancer awareness ribbons in my designs and make them a beautiful representation of life. 


Really hope I succeeded in doing that.
  Bea


Monday, February 14, 2011

Tony Hawk Skateboard Cake


Tony Hawk Cake I finished over the weekend. Truthfully, I had no idea who Tony Hawk was until after I started to do some research for this cake.  I knew I wanted to make this cake look like a skateboard because what little boy wouldn't think a cake in the shape of a skateboard isn't cool? Added an image of one of Tony Hawk's skateboard impressions and from there everything started to just come together.

My hubby helped me out with the wheels and brackets because he is meticulous about proportions and measurements so I enlisted his help with this cake. Thanks Dan! It was definitely a team effort on this one and I'm glad you are able to share my enthusiam when it comes to cake...and pretty much everything else.

Last detail I added on this cake was the eight ball to represent the birthday boy's age.


Sunday, February 13, 2011

Lady bugs...Lady bugs...Lady bugs everywhere.

These last past two days have been very productive to say the least. One of my latest projects was creating these cute lady bug cupcakes for Ally's 4th birthday. Hmmm...100 cupcakes. Too many cupcakes to make the same design for all 100 of them so made a couple of different designs to please all the little part go-ers . Made a variety of different flavors too. Chocolate, yellow and white cupcakes, some with strawberry filling. A flavor that will please kids of all tastes.


Made some blue lady bugs too. Just in case the boys wanted a more boyish bug. Had a great time coming up with the various designs. Hope this special little girl enjoyed her little lady bug cupcakes. For now I can't stop dreaming of these little bugs...lol.